
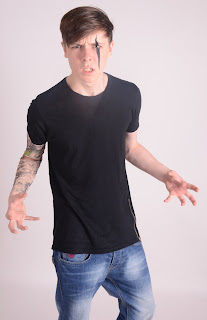
In today's lesson I started creating my front cover using Photo Shop. Earlier on, I created the masthead using InDesign and also edited my models picture from adding tattoos and piercings to even adding make-up and trousers. Before I start writing about how I edited the image, I would like to add the point that I also started to create posters and edited & added effects to other images I took because I will be using them as part of the 'free posters' that come in the magazine. I used an image of my model 'Mary' and one of 'Baris' along with an image of me. I used a black paint splash as a Puff/flash because the paint splash visually looks a lot more interesting and eye-catching rather than using a circle.
To edit my image on Photoshop, I have already added a blog post about how I added piercings and tattoos and to add the Gothic black trousers, I used the exact same technique however instead of having the setting on 'Multiply', I had changed it to 'Darken' which made the image transparent but not so transparent that it blended in with the denim jeans. Another thing I done is use the 'Dodge & Burn' tools. I used the dodge tool to go over the white areas on the eye to make the eyes sparkle and also used it to whiten the teeth. I used the burn tool to make some areas of the tattoo darker and also used the burn tool to add black eye-shadow on the eye by going over the same area multiple times. I also used the burn tool to go over the bottom eyelashes and on some areas of the hair, basically all the areas I wanted a little more darker.

No comments:
Post a Comment